Roguelike Action Card work
Posted: August 20, 2021 Filed under: Patreon Leave a comment »I added some basic action cards to the interface just in time for August’s monthly build, but you couldn’t really do anything *with* them – action use was still using the temporary UI. So today I spent a little time making it so you can fan through available action cards and select one.
Executing the action is still done with the keyboard or temp UI, but I’m planning to make it so you can click on stuff on the board soon. The game ~should~ be playable with just the mouse if all goes well 🙂
Scripted Scenes in Dead End
Posted: August 20, 2021 Filed under: Patreon Leave a comment »Since I recently finished updating this system, I thought I’d give an explanation of it for you 🙂
Dead End uses a system I made years ago (and first used in Planet of the Poison Past), which allows me to quickly write dialogue, scene direction, and a few other neat little game related things like inventory addition/removal and setting story flags.
It is based off my (very limited) experience with Ren’Py (which was wonderful) to make Important Game You Should Play. I loved how you could quickly create character settings, and then use a shortcut to refer to characters by a single letter. So that’s what I used as the foundation for my system.
OK, so lets go through the script for the above scene! It is just a text file, which the parser will read from top to bottom, processing one line at a time:

First we use the ‘char’ command to create our ‘Enid’ character, and pass along all the information we need;
- shortcut (from here on, ‘e’ will refer to our Enid character)
- display name (for dialogue bubbles with a name display, I’ve recently disabled them tho – just trying it out!)
- animation object name (name of the gameObject which has Enid’s animations on it)
- tail point object (which object a speech bubble’s tail should point at when Enid talks)

Here we specify where and how Enid’s speech bubble will appear on the screen. Position, scale, colour. Not much to it but just these go a long way to distinguishing between different characters’ speech.

We also set up Enid’s motion, this includes:
- How fast a character walks
- The name of the walking animation
- How fast a character runs
- The name of the running animation
- The idle animation
- How fast a character turns
Although not used in this scene, I can give direction in these scripts to direct characters to move about, and this stuff determines how they do that.
We do all this for each character in a scene, so here’s that for the other character, the Aristocrat:

Once our characters are set up, I specify which animations they should be playing at the start of the scene:

(These animations will stay the same throughout this particular scene, mostly because I haven’t animated much else yet, but once I have I’ll be able to say things like “e anim shocked” or “a anim rudelaugh” to have much more expression. But I’m waiting till my writing is more certain first, so I don’t make animations that I later decide not to use).

The next thing I usually do is check for item use. If the player tried to use an item and triggered this scene, we can check what item it was and go to a specific marker in our script. Here, if the player tries to use the crest then the parser will look for the “usecrest” marker, if the player tries to use any other item it will go to the “usemiscitem” marker.
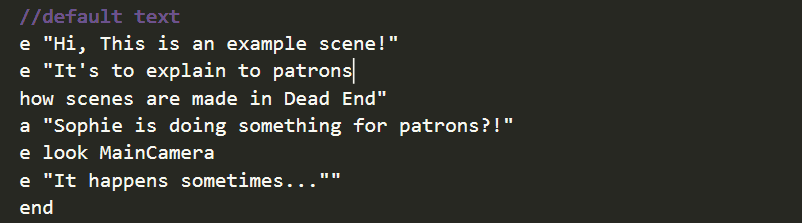
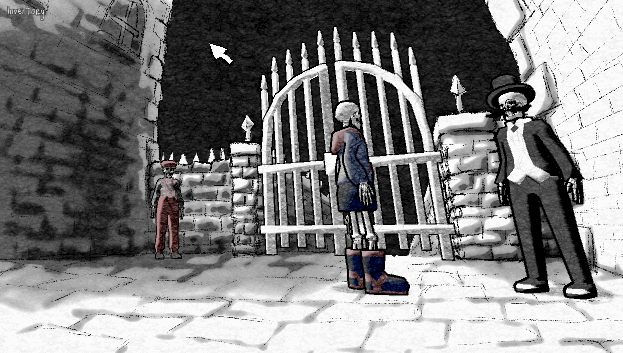
And here is the scene’s dialogue for the gif above. I use the character shortcuts (e for Enid, a for Aristocrat) and quickly write out dialogue and scene direction.
This saves a HUGE amount of time compared to any other way of writing scenes I know of, and I can make little changes without any worry because it is just a text file (no compile time!)
Finally, the ‘end’ command tells the parser to complete the scene and not to keep advancing to any more lines beyond.
But there are lines beyond! This is an adventure game after all and we did write some conditions for item use, so next we have the markers that those conditions point to:
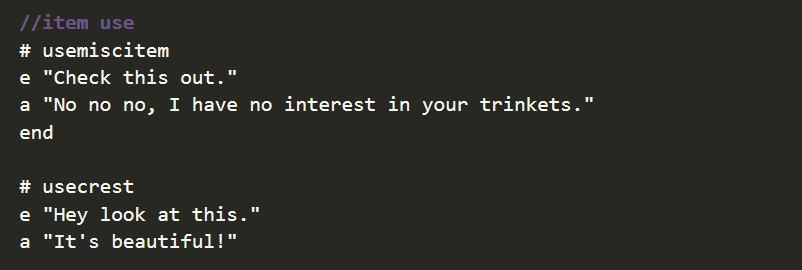
We have markers “usemiscitem” and “usecrest” marked with #, the dialogue for each kind of item use, and an ‘end’ to finish the scene.
The ‘usecrest’ section doesn’t need an ‘end’ however, because that really is the end of the script and the parser will know to end there 🙂
~
The scene parser also understands commands for dialogue choices, showing/hiding props, music cues, transitions to other levels, camera direction, character motion like “walkto” and “runto”, setting story flags (Boolean, float, int, string, vector), going to a specified line marker, going to a random marker from a list, and a command to trigger C# scripted actions for anything that the parser can’t do.
This is one of those kinds of things that takes a LONG time to program, but once it’s done you can work A LOT faster.
Like, A LOOOOOOOOT.
~
I hope this was interesting, and in case it’s useful for you I’m attaching my current parser script. It won’t do much without all of my other adventure game systems to work alongside it, but it should at least provide some insight into how I write a parser that can do all of this 🙂
As always, thanks for your support! It means bunches to me, bunches and bunches. SO MANY BUNCHES ok I gotta stop typing now BYEEEEEEEE <3
Monthly Build 2018/06 – Dead End
Posted: August 20, 2021 Filed under: Patreon Leave a comment »Guess what I’ve finally gotten back to working on! 😀
This build might initially look pretty similar to the last one, but I have done a BUNCH of under-the-hood type things and blocked out most of the second half of the game.
There is still a fair bit to do, but for me, it’s starting to feel like it’s really coming together. So I’m really happy about it 🙂
As always, I really want to thank you for your support, without it I’d never be able to work on a project like this and have a hope of finishing it. So it means the world to me! <3
(Also that skull picture up there is actually a video of me talkthing through the build, I dunno why patreon is hiding the ‘play’ button on videos for me but it is definitely a thing you can click and watch <3)
Sinput Update
Posted: August 20, 2021 Filed under: Patreon Leave a comment »So for the past month-and-a-half I’ve been working on nothing but my new input system: Sinput. It was supposed to take a couple of weeks, but in the end I spent three times that on it… even though I think it cost me a few patrons in the meantime, I think it was worth it!
Sinput is going to greatly improve how quickly and easily I can get input working for my games – a thing that normally takes a loooong time.
And if I’m honest, setting up good input systems has been such a daunting task that for some projects, avoiding it has been what killed them.
But more than just making things easier for me, over time I’ve found myself caring more and more about making sure games are as accessible as possible. I feel this is somewhere Unity’s input system fails in a very big way, and Unity developers have no easy way of getting around that – it requires quite a large time investment to make games with more accessible control options, but it shouldn’t.
With better input systems, game developers could quickly set up their games’ input to allow as many people as possible be able to play their games. With Sinput, I’ve done my best to facilitate that.
Any game using Sinput with the included rebinding scene will have controls that can 100% be rebound in the game (and not just Unity’s splash screen that doesn’t work great for many inputs, and often has to be disabled for stores to list the game as ‘controller compatible’, or for developers to avoid getting negative reviews from players who have ignorant opinions about game-engines).
Sinput also includes functionality to make various features much easier to implement, such as axis inversion, toggle controls, sensitivity, and button repeating.
I’ve also made it as easy as possible for developers to support more than just the Keyboard/Mouse/Gamepad inputs that Sinput supports right away. Virtual Inputs mean that anything a Unity script can access can be used as an input. This is how the touch control prefabs included with sinput work, but this should also work for many other things too; for example if you have a custom controller that Unity’s input system doesn’t support, you can make an interface that will work with Sinput and you won’t need to change any of your game code at all.
Because I care a lot about this stuff, a lot of the time working on Sinput up to now has been making documentation, video tutorials (with subtitles), a clear store page, and I’ve made Sinput free.
More accessible games mean more people can play, and this benefits everyone. Hopefully with the work I’ve put into Sinput, more developers will be making more accessible games and people I’ll never know will be able to have a blast playing games I might never hear about. That would be awesome 🙂
Anyway, with this I’m done working on Sinput for a while. I’ll be getting back to work on my own games now!
To patrons who kept supporting me despite my not making any gamedev posts in this time, thank you so much! Your support has made a huge difference for me and I don’t think I’d have been able to dedicate time to something like this if it wasn’t for you. I love and appreciate you so much! <3
Monthly Build 2018/05 – SeRo:Space
Posted: August 20, 2021 Filed under: Patreon Leave a comment »I can’t spend much time talking about this one because my stomach is currently staging a rebellion against me, but I did make a video talking about the game and why this is the monthly build.
You can grab the downloads below as always. And also as always I really appreciate your patronage, it really helps, thanks so much <3
Expect another post as soon as I’m better to talk in more detail about my big project this month.
o/